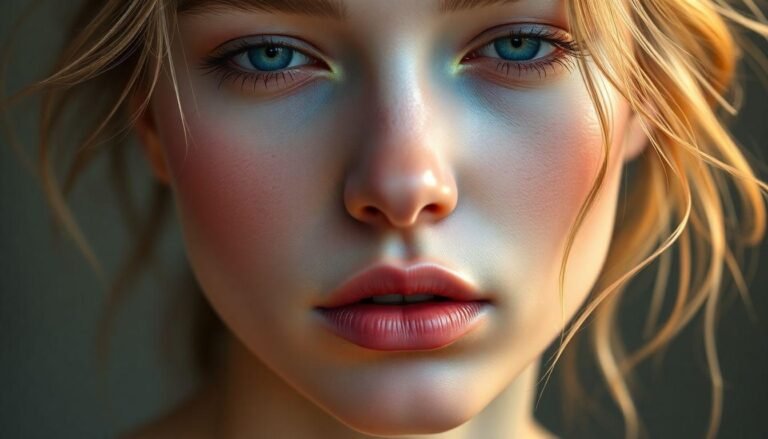
Entering the world of digital art is a thrilling journey, especially when you’re focusing on creating beautiful portraits with pale skin tones. Whether you’re drawn to ethereal fairy characters, gothic vampires, or simply want to master the subtle nuances of lighter complexions, mastering pale skin digital art techniques can transform your artistic portfolio. The delicate balance of colors, understanding of light and shadow, and attention to detail all play crucial roles in creating stunning pale skin illustrations that captivate viewers. Let’s explore some beginner-friendly approaches that will help you develop this specialized skill set.
Understanding the Basics of Digital Skin Tones
Before diving into specific pale skin techniques, it’s important to understand how digital skin tones work in general. Unlike traditional art, digital platforms offer endless color possibilities, which can be both liberating and overwhelming.
The key to realistic pale skin isn’t simply using white or very light colors. Real skin, regardless of tone, contains multiple color layers and subtle variations. Pale skin often has:
Remember that even the palest skin is never pure white—this is a common mistake that can make your artwork look flat and unrealistic.
Choosing Your Digital Color Palette
Creating a thoughtful color palette is essential for convincing pale skin renderings. Rather than selecting colors at random, try this approach:
Start with a base color that’s a very light beige or cream—never pure white. From there, create a palette that includes:
Many digital art programs allow you to save custom palettes, which can be invaluable as you develop your style. Programs like Procreate, Photoshop, and Clip Studio Paint all offer this feature.
The Role of Contrast in Pale Skin Portraits
One challenge with pale skin digital art is maintaining enough contrast to create dimension without making the skin look unnaturally dark. The trick is to use subtle value changes rather than dramatic ones.
Try working with a narrower value range than you might for darker skin tones. The difference between your lightest highlight and darkest shadow might be smaller, but those transitions become even more important.
A helpful exercise is to occasionally view your work in grayscale to check if your values are creating enough definition. If your character’s features disappear when colored removed, you need more contrast.
Essential Layering Techniques
Layering is your best friend when creating realistic digital pale skin. Rather than trying to get the perfect color in one pass, build up your skin tones gradually:
Base Layer Approach
Start with a flat, mid-tone base that’s lighter than you might expect. This becomes your “average” skin color.
Add a new layer for shadows and set it to “multiply” blend mode with low opacity (15-30%). Using cool colors like soft purples or blues, gently build up the shadow areas.
Create a “soft light” or “overlay” layer for adding warmth to cheeks, nose, and ears. A very slight pink or peach works wonderfully here.
Finally, add highlights on a new layer set to “soft light” or “add” blend mode, using a warmer, slightly yellowish white.
Common Mistakes to Avoid
When creating digital art with pale skin tones, beginners often fall into several traps:
Using pure white: As mentioned, real skin is never white. Even albino skin has subtle coloration.
Making shadows too gray: Gray shadows can make skin look dead or dirty. Instead, use colored shadows with blues, purples, or browns.
Forgetting subsurface scattering: This is the effect where light penetrates the skin and then scatters beneath the surface. It’s especially noticeable in ears and thin skin areas. Add subtle reddish glows in these regions.
Over-smoothing: Overly smooth skin looks plastic. Real skin has texture, pores, and subtle imperfections that add character and realism.
Recommended Digital Art Tools for Beginners
While technique matters more than tools, having the right digital setup can make learning easier:
Most importantly, choose tools that feel comfortable and don’t overwhelm you with options. As you gain confidence, you can explore more advanced programs and custom brushes.
Practice Exercises for Improving Your Pale Skin Art
Improvement comes with deliberate practice. Try these exercises:
Study reference photos of people with pale skin in different lighting conditions. Pay close attention to how the colors shift.
Create a “skin swatch” sheet where you paint the same pale skin tone under different lighting conditions (cool, warm, bright, dim).
Practice drawing the same character in different lighting scenarios to understand how pale skin reacts to environmental conditions.
Join online communities where you can share your work and get constructive feedback from more experienced artists.
Advancing Your Skills
Once you’ve mastered the basics, you can explore more advanced techniques like:
Remember that mastering pale skin digital art techniques for beginners takes time and patience. Be kind to yourself as you learn, and celebrate your progress along the way. Digital art is as much about the journey as the destination, with each piece teaching you something valuable for your next creation. Keep practicing, stay curious, and watch as your pale skin portraits come to life with increasing depth and realism.


